 |
||||||
|
Table of Contents
Computer
Lighting
Turntable
All of the above can be found at www.kaidan.com Digital Camera
Software
Museum (“Sticky”) Wax
Camera Tripod
Pedestal
Backdrop (optional)
Light Meter (optional)
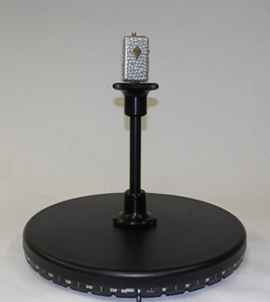
Back to Table of Contents The size, shape, color and number of objects you wish to include in your Object VR project will determine the equipment you need. A 15-inch manual turntable works well with objects that are about 15 inches in length or diameter or smaller. Larger objects may be difficult to securely anchor or to balance on a smaller turntable because of uneven weight distribution. Large or unwieldy objects may overlap the sides of a small manual turntable, making it difficult to rotate. A larger manual turntable or a motorized turntable would allow you to more easily photograph larger objects. To prevent permanent damage to your artifacts, use museum wax (inert white wax) to anchor the artifacts on the pedestal when shooting. If you are not working with artifacts or are not concerned with permanent damage to the object, you may try using a stronger adherent, such as hot glue, to anchor your objects and keep them steady. A stronger adhesive would allow easier capture of larger, unwieldy, or irregularly shaped objects. Small objects pose fewer problems. As a rule, they can be easily posed and anchored by museum wax. The only limitation to how small an object can be included in your project is the zoom capability of your digital camera. The color and surface of your objects may present challenges and influence the choice of backdrops. Black can be a difficult color to photograph. Flat black surfaces can make an object appear two dimensional in a digital image viewed on a computer monitor. Shiny black surfaces can create “washed out” areas or bright spots in a digital photograph. Reflective or shiny metallic surfaces (of any color) are difficult to photograph – reflected light can make parts of the surface seem “washed out.” These types of problems can generally be solved by adjusting the lighting. Diffusing the light source helps with shiny objects. With flat black or colored surfaces, increasing the amount of light and reflection will help make the object appear three dimensional. If your object is white in color, a black or dark gray backdrop may be needed. Make sure that your objects are clean before you start photographing. It is easy, though time consuming, to edit out unwanted elements in Photoshop or other image editing software programs. It is much easier to clean off a bit of dirt before you begin photographing. Back to Table of Contents Digital Camera If you are thinking about purchasing a digital camera, consider the following: How many megapixels of resolution do you need? Turntables When deciding whether to use a manual or motorized turntable, consider the following: How many object movies do you want to include? A manual turntable is an excellent choice for a beginner and for projects with small or medium-sized objects. It is lower in cost and more lightweight and portable than a motorized turntable. Objects can be accurately rotated at increments of 5 or 10 degrees. The manual turntable also allows the user to take time between each shot because it does not automatically turn after a prescribed time delay. The photographing process may take longer, but the user controls every step. A 15-inch manual turntable works well for small to medium sized objects. Large objects are more difficult to photograph on a manual turntable because they may overlap areas of the turntable that are crucial for turning. Using a motorized turntable takes more planning and a larger budget. However, it can be a better option for a large project or one that requires both rotational and top-to-bottom views of objects. (A simple rotational view of an object may require capturing only 36 images – one every 10 degrees of rotation. A top-to-bottom view may include up to 648 images – 18 sets of rotational views taken at 10 degree increments from top to bottom.). A motorized turntable works well with larger objects that may hang over the edges of the turntable – the user does not need to access any part of the turntable while the object is being rotated and photographed. A motorized turntable allows the user to choose more precisely the rotation of the object – anywhere from 1 to 360 degrees. It also can be set to rotate and pause at timed intervals. With motion control software, it can be integrated with the digital camera and image capture, allowing full automation of the process. For example, the turntable could rotate every 8 degrees with a 5 second pause between each shot.
Image Resolution Before taking any photographs, consider the ultimate uses of the images. The image resolution (measured in pixels per inch – ppi, or dots per inch – dpi) and image size will need to be set on the camera before you start shooting. The resolution of a digital image is a measure of image sharpness based on the number of pixels in each inch in the image. The higher the resolution, the greater the detail you will be able to capture in your image. Resolution also affects the enlargement of pictures. If the images will serve as archival copies, they should be made at a high resolution and large image size to allow for the greatest amount of detail. (When you save the images on your computer, save as 600 dpi TIFF images). If the images will only be used on a Web site as an Object VR movie, the images could be shot at a lower resolution or image size, and then saved on your computer as 72 dpi TIFF images. The standard for images presented over the Internet is 72 dpi JPEG, so images saved at a higher resolution will need to be converted to (or copies “saved as”) 72 dpi JPEGs for Web presentation. The ultimate interactive movie may consist of 36 or more images, so file sizes can be very large and may take a long time to load. However, if download time is not an issue – for example, the interactive movies are to be used over an intranet system or only by users with T1 connections – larger file sizes may be acceptable. There is an advantage to higher resolution images because they will have much better zoom capability. Keep in mind that it is easier to edit higher resolution images in Photoshop or similar image editing programs. You may prefer to photograph and edit using a higher resolution and larger image size, and then save your images at 72 dpi for Web presentation. Back to Table of Contents
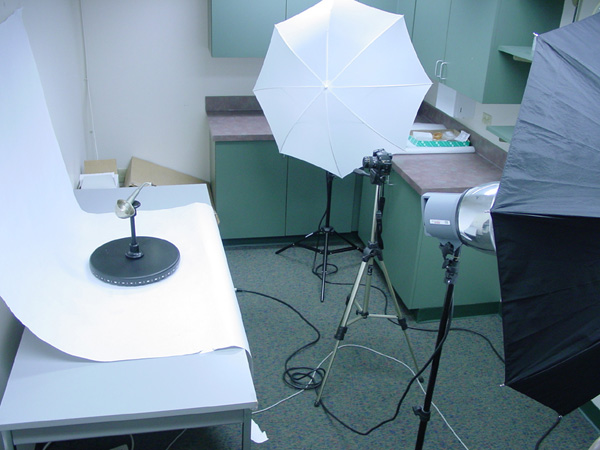
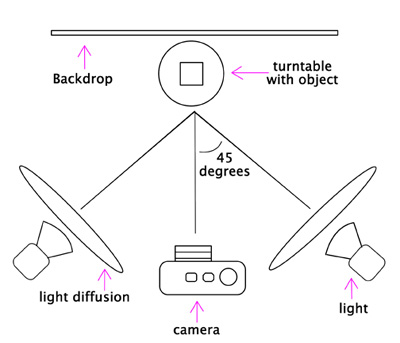
Studio Setting up a small photography studio is not difficult. A space with low to no natural light is recommended. For example, a large closet or a basement works very well. The studio used for our project was approximately 8-1/2 x 16 feet. If there is no space available without windows, you can fashion light barriers with dark fabric or paper. Another option is to photograph the objects after sundown. Make sure that there is a level surface for placing the turntable and enough room to have at least two lights on stands. The tripod and camera need to be far enough away that you can capture the entire object at each rotation. Lighting An inexpensive option is to buy tungsten light bulbs at a local photography store. They are a few dollars and can be placed into any industrial clamp light fixtures, which are usually available at a hardware store. When buying clamp light fixtures, make sure to buy ones with a ceramic base instead of a plastic base. They are a few dollars more, but will not melt when using high wattage bulbs. Make sure to purchase large clamp lights; they are usually about 12-inches in diameter. These fixtures can be clamped to light poles or any upright structure, such as a bookcase. Clamp light fixtures with tungsten light bulbs are often less predictable and harder to work with than professional-grade light kits – for example, it may be harder to aim light on your object. However, with practice and patience these lights can be just as effective. When using tungsten lights, be sure to set your camera’s light setting to Tungsten to ensure proper color. Select tungsten bulbs that are at least 250 watts. Halogen light kits can be purchased at a local photography store or from online vendors. Halogen lights are very bright and work well. One drawback – depending on the model – is that they have globes to fit over the bulb that are not always attached securely and can fall out of the fixture and break. Light umbrellas should be used with halogen lights. If the halogen lights do not come with umbrellas make sure to purchase some made especially for photography. Light umbrellas are available in different colors and surfaces. Umbrellas with silver, gold or metallic interiors have a reflective surface which allow more light to bounce onto the object and may modify the color of light. Reflective umbrellas may create a bit of glare on objects that are shiny. A white umbrella diffuses the light more and creates a much softer light to be cast on the object. It is recommended that you use two identical umbrellas. Place your lights on each side of the tripod. Lights should be mounted at 45 degrees to the lens axis and equidistant to the object. This will provide even, uniform lighting and should help to eliminate shadows. Other lights can be used to fill if there are still shadows. Windows and doors should be covered or closed to keep out most if not all natural light from the studio space. After setting up the lights explore the camera’s light settings. Most cameras come with profiles for different types of lighting situations. Change the settings and look to see which one produces an image that has the same colors as those you see with your eye. This will keep your colors true. Though you can photograph your objects using the digital camera’s flash bulb, we recommended that you use either tungsten or halogen lamps.
Backdrop A backdrop is optional. Since editing the images is usually necessary, a backdrop is not crucial. However, if the Object VR movies are to be used as instructional or educational tools and will not be posted on a public Web site, the background may not matter. These images can be captured against a wall showing the turntable if that is the desired result. Or the object can be framed in the camera’s viewfinder so that the turntable is not in the shot. If your project does not allow time to edit each image, consider using a black background. Black is a good option because a black cloth can be draped over the turntable in order to hide it. The camera will keep the black true and your images should not need much editing. However, not all objects may be fully visible against a black background. Details will disappear quickly so make sure to check images before turning them into a final movie. Make sure that enough light is available to pick up the fine details that you want your viewers to see.
Unless the object you are photographing is white, a white background is the best option for making the objects pop off the screen in the final Object VR movie. A completely white background is hard to achieve without editing. Hanging a white or light-colored sheet or seamless paper will give you an almost white appearance without much difficulty. Another option for a white background is to bring the white backdrop away from the wall and light it from behind. Make sure that the lights are far enough away from the back of the cloth or paper in order to eliminate bright (“hot”) spots of light. (This will require two sets of lights.) Yet another option is to bring the object away from the background and light the backdrop separately from the object. (This will also require two sets of lights.) This can be combined with the former option for a truly white background. Be careful that none of the light on the backdrop floods onto the object or your object’s edges will begin to disappear. Be sure to preview your images to check your camera’s aperture and shutter speed – you may have to experiment with different settings to achieve the desired effect. A professional photographer or a local photography shop may be a good resource in helping with suggestions on how to create a white background. However, if you are editing out the turntable and pedestal, the background can be edited as well and a completely white background achieved. Camera Placement The camera and tripod should be placed directly in front of the object. Make sure that they are far enough away so that the entire object is contained within the image frame when the camera is set at its widest angle. If you are capturing a single rotational view of the object, make sure that the camera is directly level with the object. This will keep the object’s motion more realistic in the movie. In order to create a smooth Object VR movie it is important that the camera remains firmly in place and steady when shooting. This is why using a tripod is critical. The easiest way to ensure that there is no movement of the camera when photographing is to use a remote control device to activate the camera. This will keep the camera from moving as the shutter is released. After setting up the backdrop, the lights, and the camera it is time to start capturing the images. Back to Table of Contents Camera aperture and shutter speed Camera aperture and shutter speed will need to be manually set for each object you are photographing. The automatic settings on your digital camera should not be used because the camera may change its settings as the object is rotated, and the resulting series of images will not look like they have the same lighting. This will cause the final movies to appear jumpy. Consult your camera’s manual to learn how to set the aperture and shutter speed. Newer digital cameras have very clear LCD screens that accurately show you what your lighting will look like. Unless the objects you are photographing are similar in size, shape and color, you will need to check and possibly change your camera’s settings for each object. Using the Turntable
Uploading images to your computer After you have captured your images – for example 36 photographs taken at 10 degree increments for one full rotational view – transfer the images to your computer using a USB cable. Do not move the tripod, camera, lights, or object – you may need to re-shoot one or more photographs. Most digital cameras should come with a cord that will connect the camera directly to a computer. If you cannot connect your camera directly to your computer, you will need to remove the memory card from your camera and upload the images to your computer using a card-reader. You may not be able to replace the camera on the tripod at exactly the same position in this situation. Depending upon the preferences you have set on your computer, you will probably be prompted to open a folder for your images (PC) or be prompted to save your images in iPhoto (Mac). Save the images in a folder and clearly indicate that these are the original photographs taken of the object. [During the image processing steps, you will be creating several versions of these original images. It is best to keep each complete group of images in separate folders.]
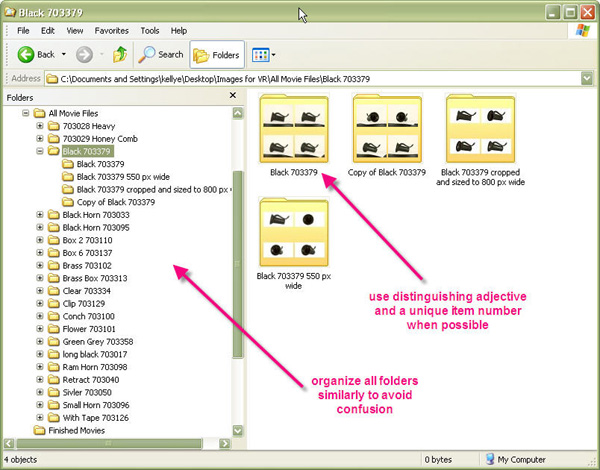
Review your images to make sure you are pleased with them. For example, make sure that the object is fully visible in each shot and that no edges have been cut off. If there is an image that is not right – for example, the image is blurred or a hand was caught in the frame – go back and retake the image while the lighting, camera and object are in place. There is a simple way to determine at what degree a shot was taken by counting what number picture it is. If you shot photographs at 10 degree increments, your first shot was taken at 0 degrees rotation, the second at 10 degrees, etc. If you want to retake picture number 7, then rotate the turntable to 60 degrees. Repeat the above for each object and remember to change the lighting, camera placement, and camera settings for each object as necessary. Back to Table of Contents Making Folders Keeping your images organized is critical because of the large number of images necessary to make Object VR movies. You can organize your images by object or by steps in the process. We do suggest that you keep backup copies of all of your original photographs. Be consistent with your naming conventions. For instance refer to all objects by a unique item number or refer to all objects by a unique descriptive name. Images Organized by Object
Object B
Images Organized by Steps in the Process
Original Images back up copies_600dpi_TIFF
Edited Images_600dpi_full size_TIFF
Edited Images_72dpi_full size_TIFF
Edited Images_72dpi cropped to 800x600_JPEG
Edited Images_72dpi cropped to 600x450_JPEG
Finished Movies
Background and pedestal elimination Once your images are saved on your computer, you can begin editing the images in an image editing program such as Photoshop. This software will allow you to rotate or crop the images, eliminate or alter the background, eliminate the pedestal or turntable, or “clean-up” the images of your objects as necessary. Just remember that your individual images will be “stitched” together to create an animated movie, so any rotating, cropping or color balance changes you make to one image must be made to all images. For specific help in using Photoshop or other image editing software, consult the “Help” menu of the software or any of the many online reference guides and tutorials. The following instructions refer to Photoshop 6.0 and present only one of many ways to edit your images.
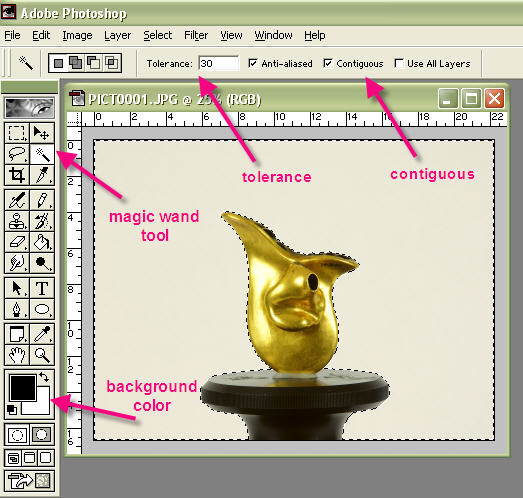
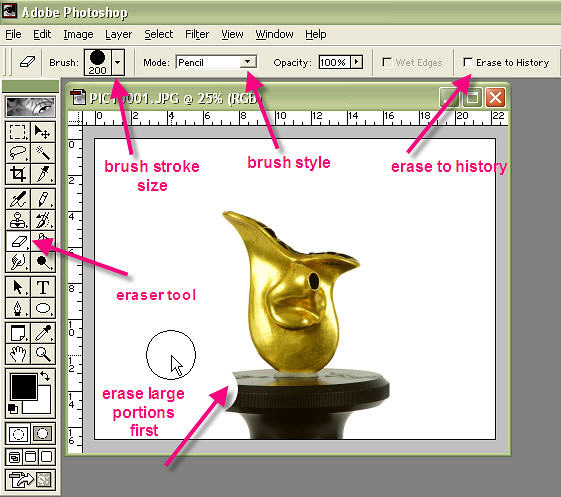
Open your first image. You can use the Magic Wand Tool to change the background color surrounding your object. The Magic Wand Tool is used to select specific areas in your image based on the color and brightness similarity of adjacent pixels. Since you are interested in choosing only colors in the background, make sure to check the “Contiguous” box. Enter 30 in the Tolerance field. Click anywhere in the background to select the area around your object. If the selection has taken away some of the edges of your object, try decreasing the number in the Tolerance field. Don’t worry if some of the object is selected – it can be brought back later (using the “Erase to History” option of the Eraser Tool). Keep the tolerance high enough so that the Magic Wand is actually selecting most of the background. This can be a tedious back and forth task but remember that portions of the object can be brought back later. Set the background color on the Photoshop Tools Bar to white (or other desired color). Once the background area has been selected using the Magic Wand tool, hit the delete key. This will change the background to white (or other desired color). Once the background color has been changed, the pedestal, turntable and any museum wax can be erased, and any parts of your object eliminated by the Magic Wand Tool can be restored. This can be done with the Eraser Tool.
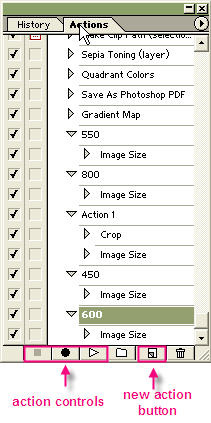
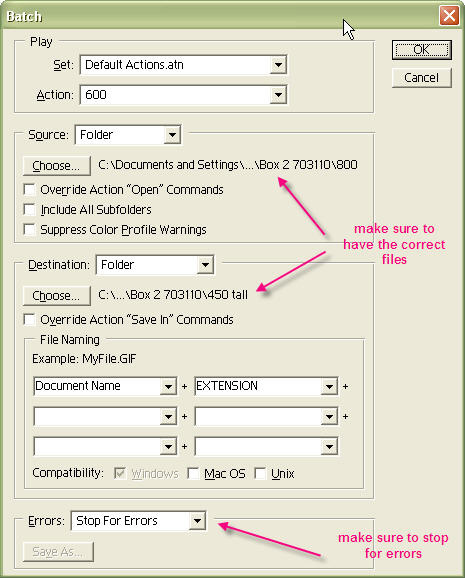
Select the Eraser Tool and set the brush stroke to a large size, such as 100 – 200. Select “pencil” from the Mode option. This will create hard edges, which are easier to control when erasing large sections, such as the pedestal or turntable. Once most of the pedestal and turntable are gone, change to a smaller brush size and change the mode from “pencil” to “paintbrush.” This will soften the edges of the stroke so there are not any hard edges and it will look more natural. If a portion of the object is erased by mistake, you can restore those portions by using the Eraser Tool’s “Erase to History” option. After you have clicked on that option you can “un-erase” any areas of the image and restore the original image. This is a great way to bring back edges or the very bottom two or three pixels of the object. You can also use Photoshop’s History palette to go back to any previous step in your editing process. Editing is the most time consuming part of creating Object VR movies since you have to edit each individual image. Depending on what kind of objects you are using in your project, it may take several hours to do 36 or more photos. Many factors influence the amount of time needed to edit. The smoother the edges of the object, the easier they will be to edit. If it is hard to detect the delineation between the edge of the object and the pedestal, then it may take longer to erase the pedestal and recreate the bottom of the object and make it look realistic. Users who are already familiar with Photoshop or another image editing program will be able to work more quickly than new users who are just learning to use the software. Some images may take only 30 seconds to edit. Others may take 10 to 15 minutes. Alignment of Object If your object was centered on the turntable, then it should be properly aligned in each of your series of images. You can check to see how well your images are aligned by turning on the Rulers in Photoshop (click on “Show Ruler” in the View drop down menu) and setting guides for the center and edges of your object. Individual images can be adjusted using the Move Tool and the right and left arrow buttons on your keyboard. Cropping and resizing images Before you create the Object VR movie, all the images should be sized to their final intended pixel dimensions. If this is done in Photoshop, the final image will be sharper than if it is done in VR ObjectWorx. Determine what the final pixel dimensions of the Object VR movie should be. For Web presentation, this can range anywhere from 200 to 800 pixels wide, depending on the browser resolution of your intended audience. You may consider providing two sizes of Object VR movies – one suitable for users with browsers set to the smallest screen resolution (800x600 pixels) and a larger version better suited for users with browsers set to higher screen resolutions (such as 1024x768 pixels or 1152x864 pixels). Make sure to crop your images before resizing. Photoshop has an Actions function which allows the automated batch processing of images. Both the cropping and resizing steps can be done using an automated action sequence and can be combined into the same sequence or can be applied separately.
Repeat the above steps to resize your images. Or you can include both the cropping and resizing of images within the same Action. When resizing images, make sure that the “Constrain Proportions” box is checked. Back to Table of Contents Using the Software Once your images are cropped and resized, making the Object VR movie is quite simple using the VR ObjectWorx software. Before you start, create a separate folder for your finished movies.
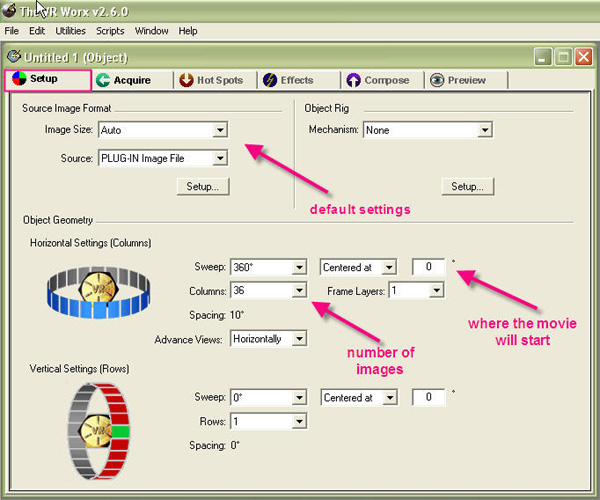
On the Setup dialog box, set Image Size to “Auto.” The Source should be “PLUG-IN Image File.” Object Rig Mechanism should indicate “None.” Object Geometry settings reflect the number of images to be stitched together and the degrees of rotation. For a single rotational view of an object, with 36 images taken at 10 degree intervals, set the Sweep to “360 degrees,” Centered at “0 degrees.” The Columns setting reflects the number of images – set it to “36.” Frame layers should be set at “1.” Set Advance Views to “Horizontally.” The Vertical Settings (Rows) should be set to “0.”
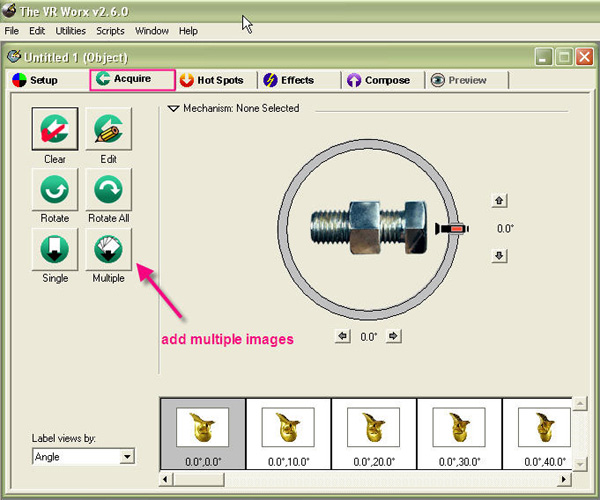
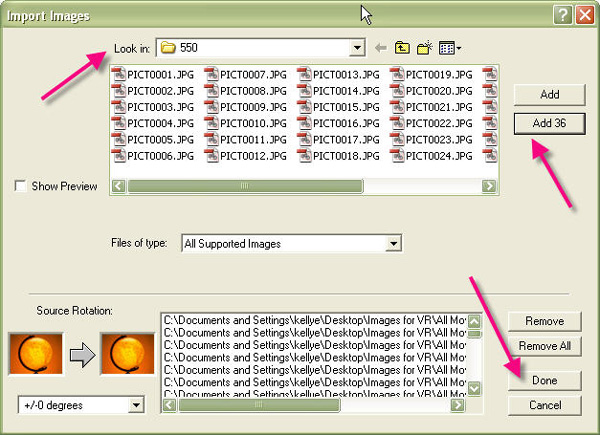
Go to the Acquire screen and click on “Multiple.” An Insert Images dialog box appears. Navigate to your folder with 36 images (cropped, resized, JPEG format). You can either highlight all of them and click “Add” or if there are exactly 36 images, just click on “Add 36” button. Then click the “Done” button.
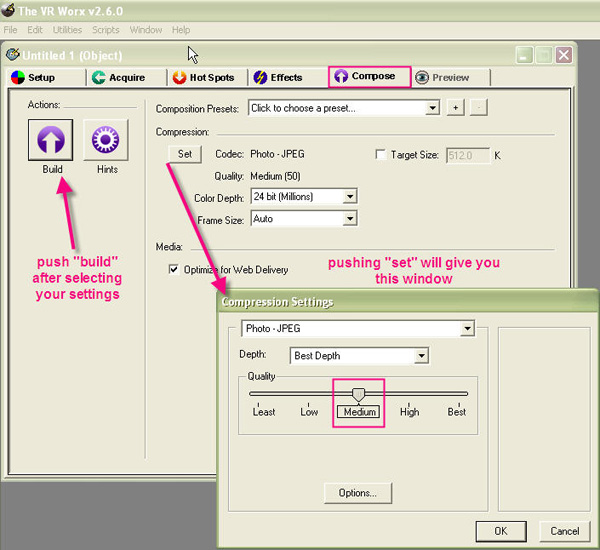
Go to the Compose screen. You have the option to change the default compression of your movie. Choosing a higher compression increases the file size of the movie, but does not change the clarity of the zoom function in the finished movie.
“Medium” compression should be a suitable choice for most Web presentation applications. Click on “Build.”
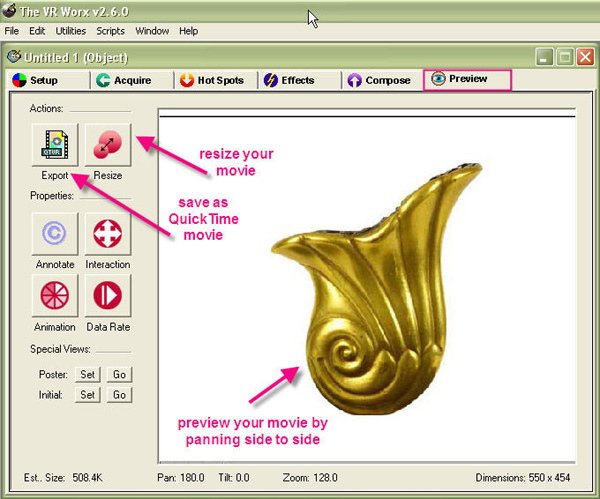
Go to the Preview screen to preview your interactive movie. You can use the Resize option to change the dimensions of your movie, though this is not recommended. Click on Export to save your finished movie as a QuickTime file (*.mov). Be sure to save the movie to the appropriate folder of finished movies. You can also save the movie as a “VR Worx Object Project Document” (*.orx) by using the File “Save As” option. This is useful if you would like to further edit the movie at a later time. VR ObjectWorx allows you to create “Hot Spots” (hyperlinks) within your Object VR movies. Text annotations providing name, copyright and description can be embedded in the movie. Consult the online tutorials or Help menu to learn about this and other effects that you can include in your movies. The stitching together process of making Object VR movies is very quick. Using VR ObjectWorx takes only a few minutes for each movie. Back to Table of Contents VR ObjectWorx creates movie files (*.mov) that are viewable using the QuickTime viewer, which is available free from Apple and is compatible with both PCs and Macs. These movie files are also viewable using the RealOne Player, though QuickTime is recommended. Other Object VR software may create movies that require a different viewer. In addition, Flash MX can be used to convert several different movie formats (*.mov, *.avi, *.mpg, *.wmv) into files viewable using a Flash player, rather than media players such as QuickTime, RealOne Player, or Windows Media Player. If you are incorporating Object VR movies into a Web-based project, be sure to note which viewers are required and provide hyperlinks for your users to download the necessary plugins. Back to Table of Contents
|
||||||||||||||||||||||||||||||||||||
| Home | Movies | How To | Resources | FAQ | About | Rights |
| Back to Top | © 2006-2009 Washington University School of Medicine, St. Louis, Missouri All rights reserved Published by the Bernard Becker Medical Library |
